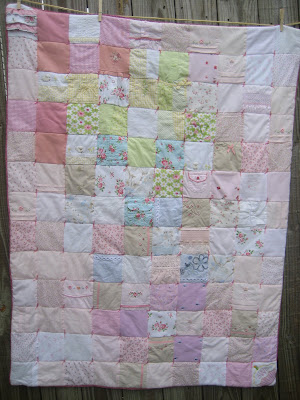
I folded and rolled and posed this thing in a million configurations, and I can't believe this is the only picture I managed to get of the finished product. I used bias binding, thinking this was the most proper method, but it would have looked much better on straight grain. The pattern calls for high-loft batting for playmat purposes, and I think I used a medium loft. It is quilted using stitch-in-the ditch method.
Tuesday, July 13, 2010
Amy Butler Quilt for Joshua
I folded and rolled and posed this thing in a million configurations, and I can't believe this is the only picture I managed to get of the finished product. I used bias binding, thinking this was the most proper method, but it would have looked much better on straight grain. The pattern calls for high-loft batting for playmat purposes, and I think I used a medium loft. It is quilted using stitch-in-the ditch method.
Hello Again, and Fickle Me
I am mom to 7 year-old Mason and 3 year-old Sadie as well as a Middle School Science teacher, so my sewing time is precious. (And I have discovered that I am no multi-tasker when it comes to sewing. Housework and parenting seem to take a back seat when I am working on a project.) Nevertheless, some sewing has been accomplished in the last year. I will be documenting my projects in the last year in a series of new posts.
I've described myself as a Jack-of-all-fiber-arts, Master of none. I guess this is because I seem to grow tired of techniques just as I get close to becoming proficient. I guess I really am fickle when it comes to crafting. Or at least attention deficient. This blog previously concentrated on heirloom sewing and smocking. I guess the closest I have come to heirloom-quality sewing is mastering French seams. Since I can't seem to sew a decent sleeve, I'm having trouble mustering the desire to go much further. I don't even enjoy smocking as much as I used to--though that will not stop me from sewing at least one smocked garment (hopefully) each year for Sadie. And, it is a good trick to have up one's sleeve for unique baby gifts.
Which brings me to my newest diversion: Quilting. This will be the subject of many future posts, and I've found a wealth of breathtaking modern quilting blogs from which to draw inspiration. For now.
Stay tuned!
Tuesday, June 30, 2009
Grummie's Pillow
Tuesday, June 16, 2009
Meet My Friend Sara
Thursday, May 21, 2009
I finally made the pillowcase dress.
I think the elastic gives it a neater finish.
Cute trim, huh? I ordered these from eBay. Probably a craft project from long ago...
This was a fun, easy project. I'll have to be on the lookout for more pillowcases!!
Sunday, May 3, 2009
Amy Butler's Sleepy Snail
Meet Amy Butler's design, Sleepy Snail. Isn't it cute?? It is from this book I got for Christmas:
The book has oodles of cute things in it. Unfortunately, most of them are too young for my just-turned-two-year Sadie, so I hope to get some good baby gifts out of it. The Sleepy Snail caught my eye immediately, and I just happen to have a good friend due to give birth to her third child in July!Here is my version:
Look at these great Moda fabrics used on the stripes and the dotted pillow base.
The ruffle part of the pillow is Amy Butler, and is actually the same fabric used on the model in the book. It is a pretty large critter, and will definitely make a statement in the nursery!
I have some great scraps left over, and they are begging to be made into a little kitty (also from this book) for Miss Sadie. Annnd, as long as she's still in diapers, I should probably make the cute diaper bag for myself, right??
Friday, March 27, 2009
The Quilt
This was the inspiration: from Martha Stewart Baby:
First came the cutting. My version is made of 130 4x4" squares of fabric from favorite baby clothes. I was shooting for a 12 square by 15 square quilt, but ran out of fabric and oomph at 10x13, which coincidentally is my birthday :) Then, some obsessive placing and positioning.
I was going for a watercolor effect, with a gradation of bright colors from upper left corner down to lower right. I don't know that anyone else will notice, but at least it gave me some direction!
I did find a wonderful raspberry crochet yarn to tie the quilt together, but could never find the right color binding. Finally, I just made my own:
I even did the nifty continuous binding strip trick, by cutting a square into a parallelagram and sewing it into a tube, then you cut along your measured line, and you have a continuous strip of fabric! And since my nifty bias tape maker is for 1/2" SINGLE fold, I had to use another trick for making 1/2" double fold as seen here: Gotta love sewing blogs for all these neat tricks. It isn't really true quilt binding, but sewn in between the quilt top and backing like large piping.
This is the finished product:
(Ugh--why is it such a pain to load pictures onto Blogger? I must be doing something wrong. And why did it turn all my pictures around?
It was fun to do, and turned out pretty much like I wanted it to. Sadie seems to like it: she tried to go "nigh-nigh" while I was ironing it!